注意
本文最后更新于 3年前, 部分内容可能已经过时,请注意甄别。
硬件安全密钥折腾记 —— CanoKeys
由于当时拍摄的开箱图片保存不当,目前已经无法找到。因此,博文 条 幅 使用了 其他博主的图片1。
序
在 @shiro 的推荐下,笔者于 2022 年 6 月份花费 ¥169 购买了 CanoKeys。由于那时候
学业繁忙,密钥的使用与测试一直搁置至今。
CanoKeys 可以理解为 Yubikey 的开源实现:
- 协议、功能都是对标的 YubiKey;
- 可以用 YubiKey 的官方程序来连接使用 CanoKeys。
本文旨在补 🕊了好久的 开箱、功能体验,分享其中的注意事项以及最终使用总结。
由于几乎全部的功能都是参照 YubiKey 实现的,因此网上 YukiKey 的教程应该是共通的。
如果你还不知道 Yubikey 、Canokey 或类似的硬件密钥是什么,可以通过 Zenithal H 同学的博文 『从 Ant Design GitHub 失窃案谈开去:国内有可用的2FA吗』和 公开演讲 『CanoKey 应用、代码与实现』来对其进行了解。4
笔者自己使用 Windows,ArchLinux。目前 ArchLinux 环境炸了5,因此本文初版将以 Windows 为基础介绍。
修改初始令牌
到手修改默认密码应该算是大家都应该掌握的 安全常识 了吧?物理安全密钥更是如此,他肩负你的身份认证的重任,请重视~
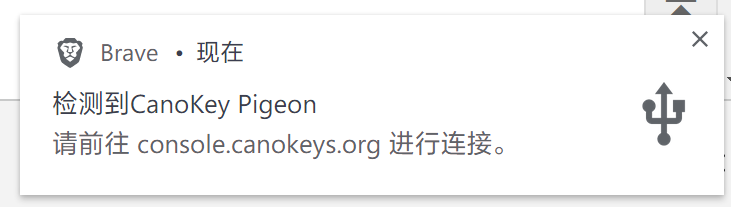
插入 CanoKeys 后,你的桌面将弹出浏览器的提示框,点击它,进入配置页面进行设置密码。
- Firefox 目前仍然不支持 Web USB API,如果您的只安装了 Firefox,可能需要自行再安装一个 Chromium 内核的浏览器。
- 如果您对在哪里修改密钥有疑问,可以参考此节末尾的配置流程。
| PIN 名称 | 默认值 | 说明 |
|---|---|---|
| Admin PIN | 123456 | 用于在 web console 上管理 CanoKey 上的不同应用,如,重置应用,修改触摸策略等。 |
| FIDO2 PIN | 部分强制使用 PIN 的 FIDU2/U2F 应用会询问此密码。FIDO2 PIN 没有预设值。用户在首次使用强制 PIN 的 FIDO2/U2F 应用时会收到设置 FIDO2 PIN 的提示,此时用户可以自己设置该 PIN。 | |
| GPG PIN | 123456 | 用于常规 GPG 操作,如 GPG 签名等。 |
| GPG Admin PIN | 12345678 | 用于 GPG 应用的管理操作。例如,在 CanoKey 上生成 GPG 密钥对,或者修改 GPG 密钥属性时,会需要该 PIN。 |
| PIV PIN | 123456 | 用于常规 PIV 操作,例如 PIV 身份认证、通过 PKCS#11 调用 PIV 进行签名等。 |
| PIV PUK | 12345678 | 用于在 PIV PIN 被锁定后的解锁操作。 |
注:此列表取自官方维 基,仅对发表时间的有效性担保,如后期与官方表格不同,请以官方表格为准。
密钥保存策略
一时间很难记住 高强度的,难以破解,难以追踪,有区分度的密码的,因此我推荐将修改的口令保存下来。
首先,我们肯定推荐是 锁进保险柜里的类纸制媒介。
但是,像我这种 健忘的,常用的密码心算规则都被泄漏个精光的;使用多重保险的电子载体或许也是一种不错的 妥协折中 方案。
- 将密钥文件保存进 A 保险柜;
- A 保险柜密码交给 B 保存,且开启 二 步 认证(最好是手机端确认的);
- A 保险柜保存了 B 解锁的关键信息,且 B 的密码规则是独一无二的。
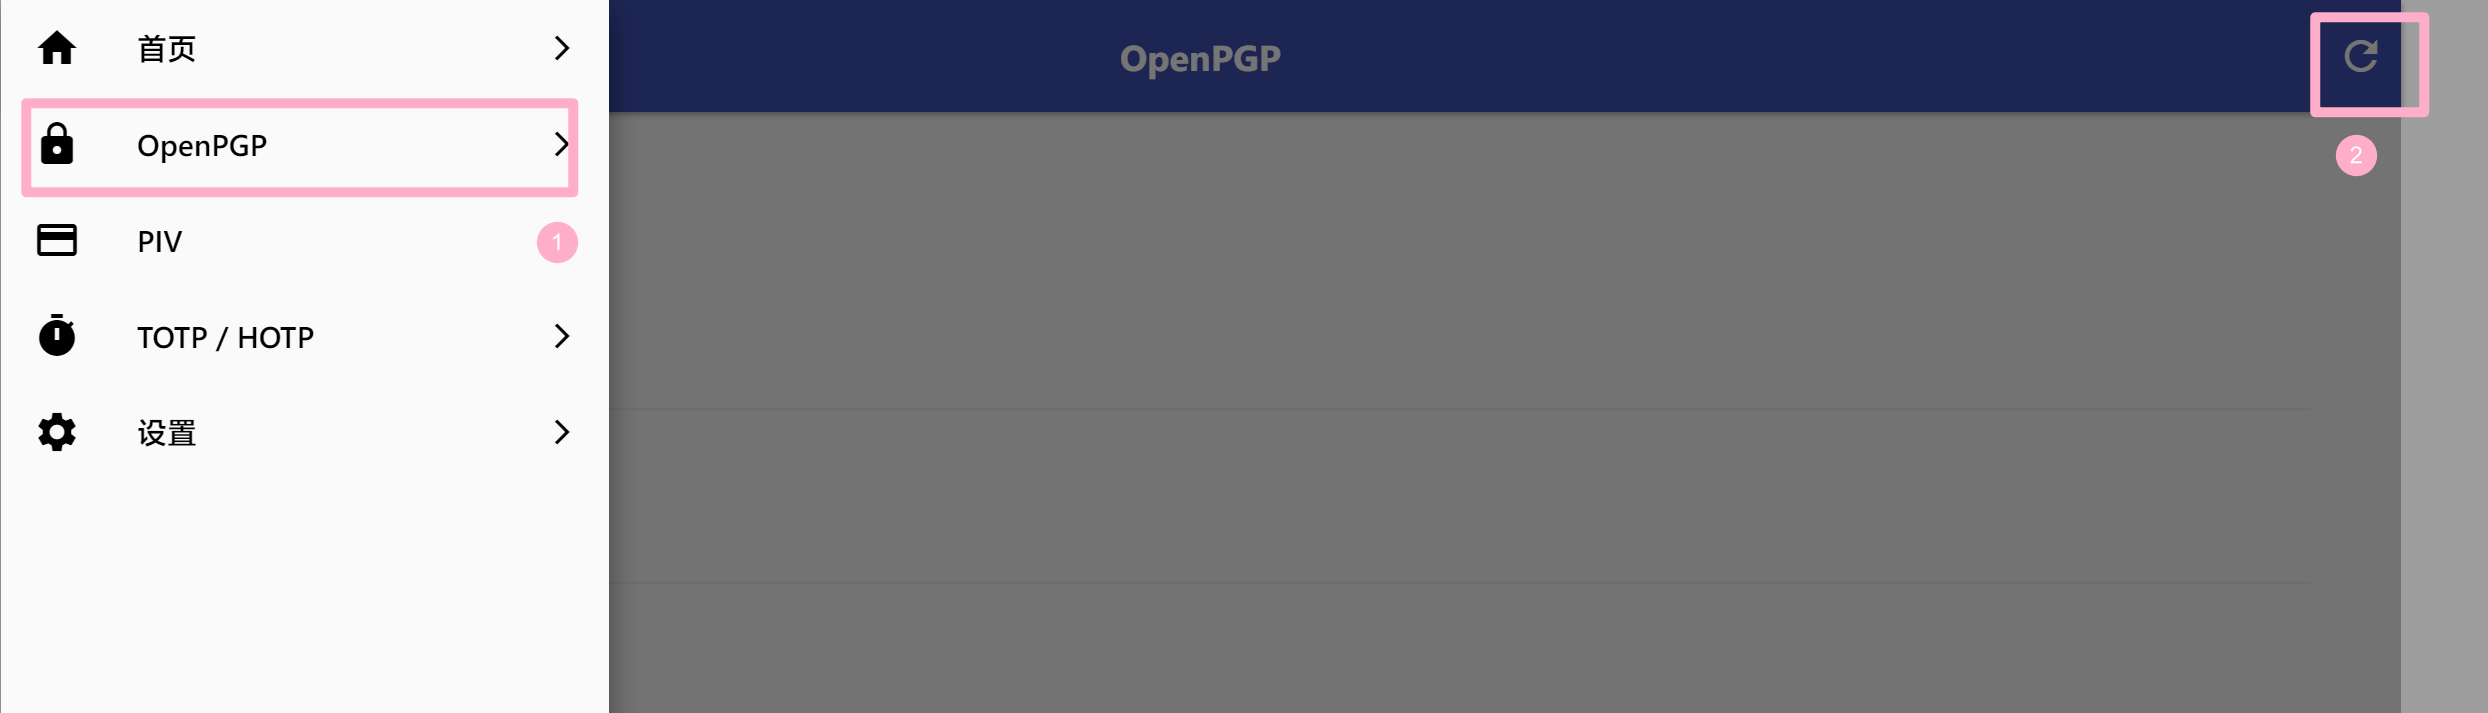
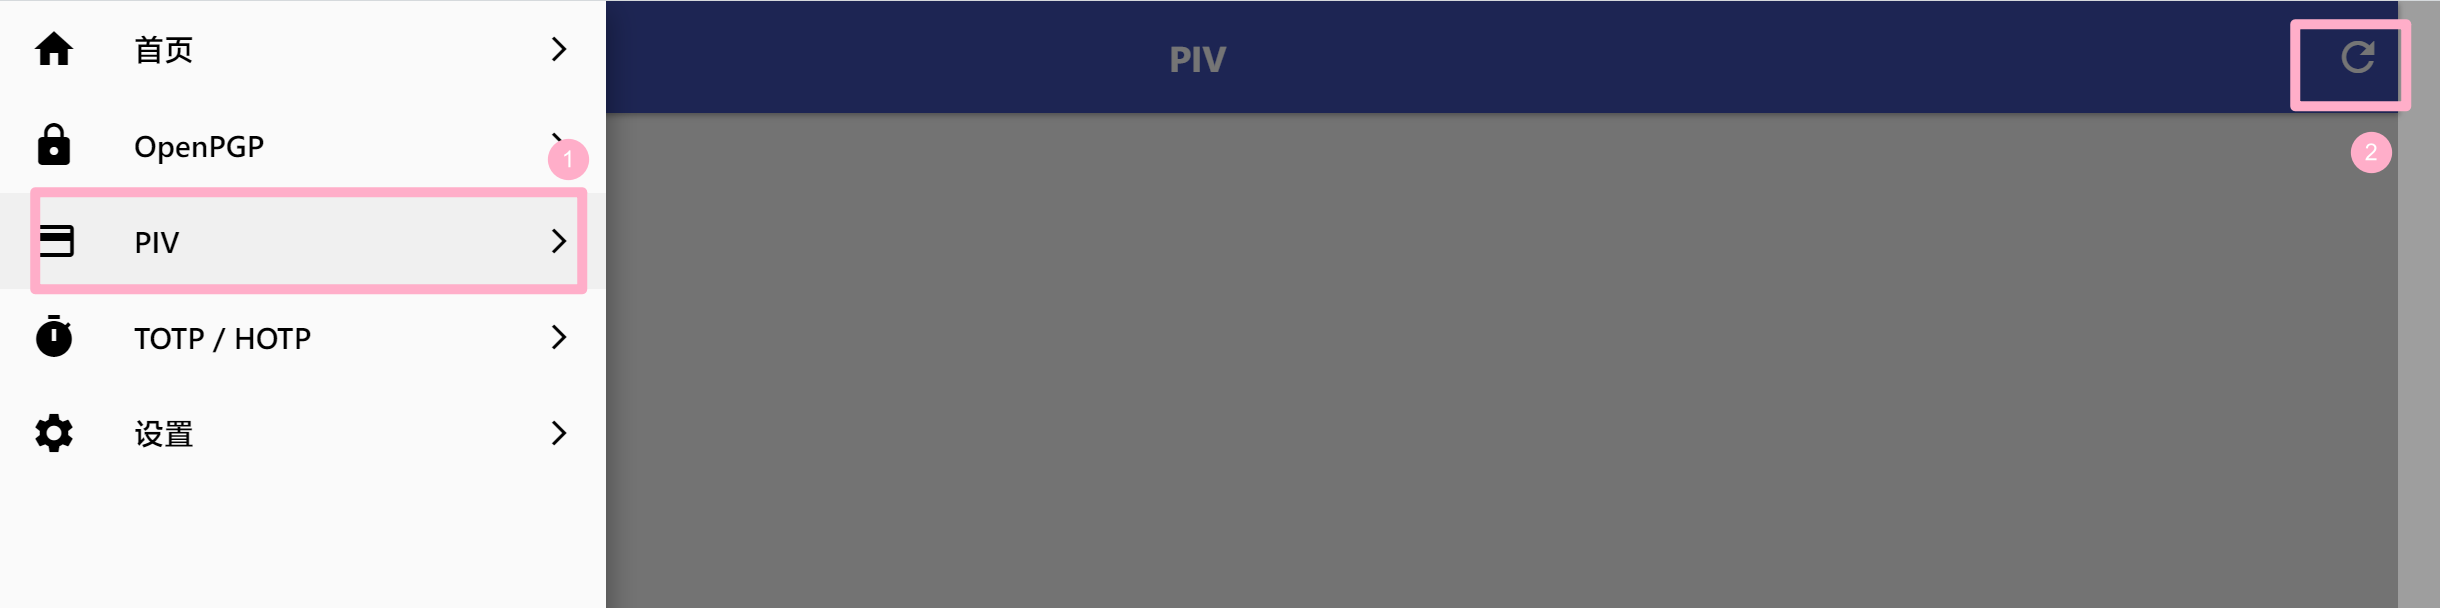
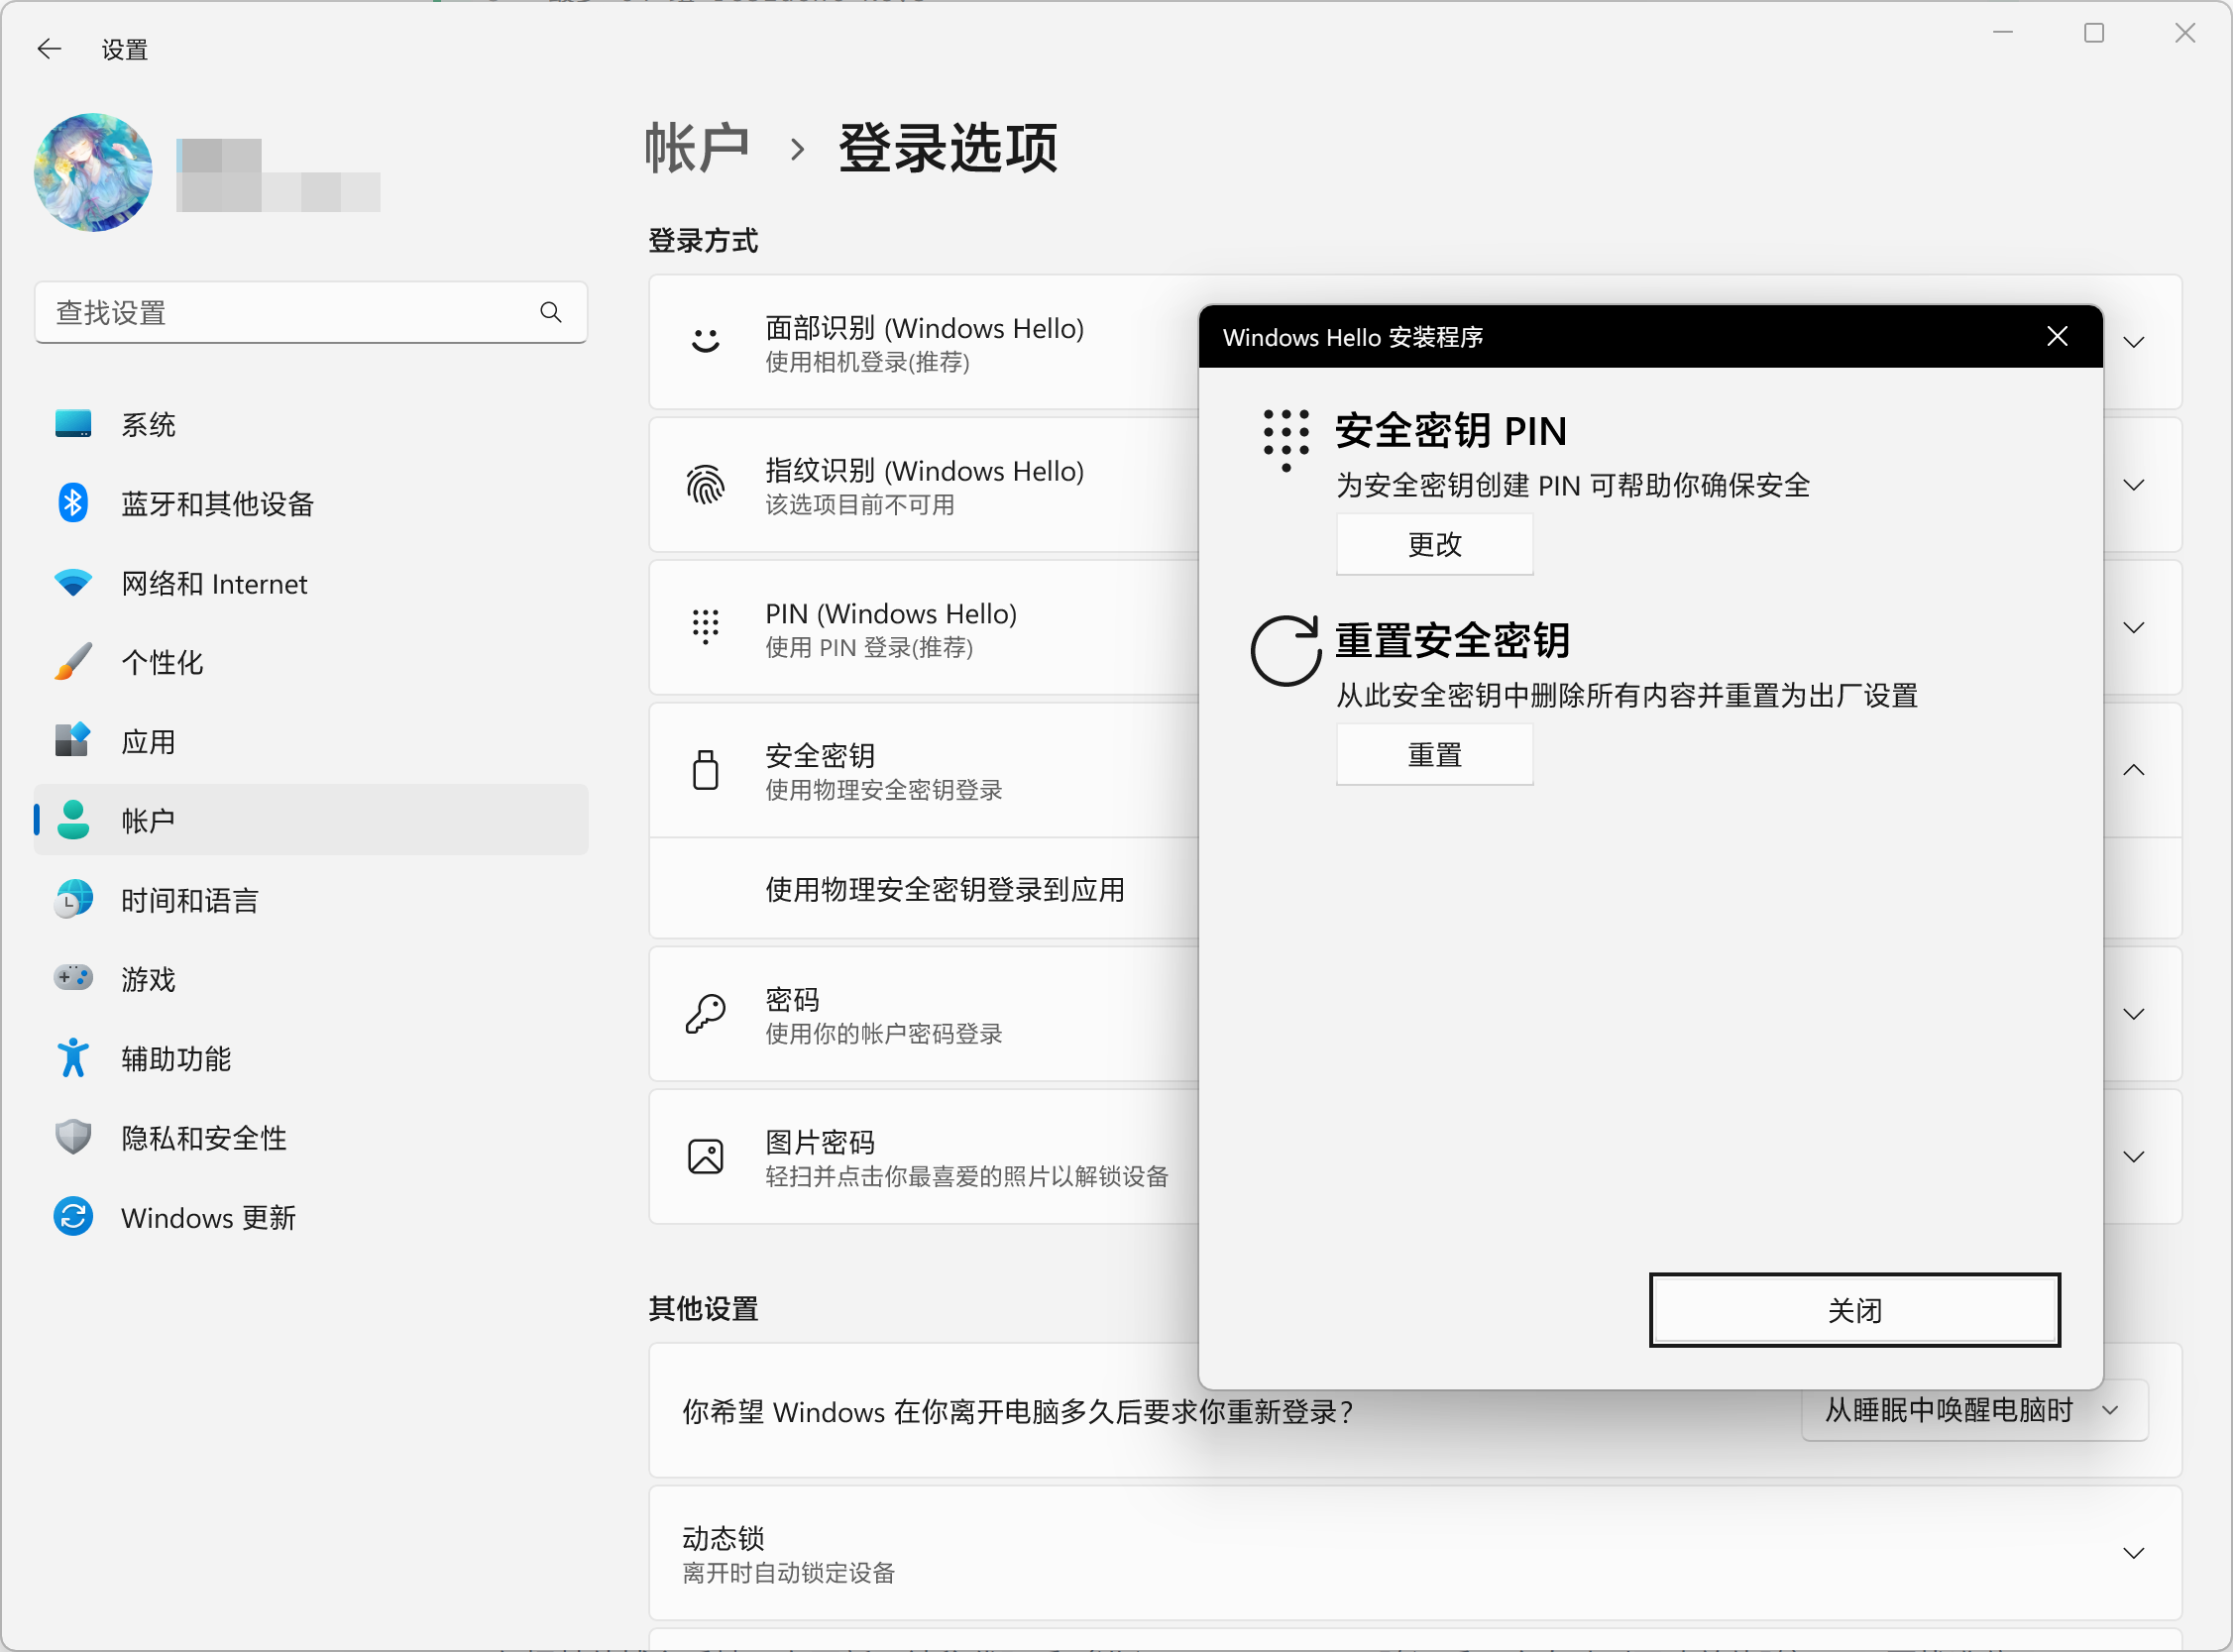
Admin PIN
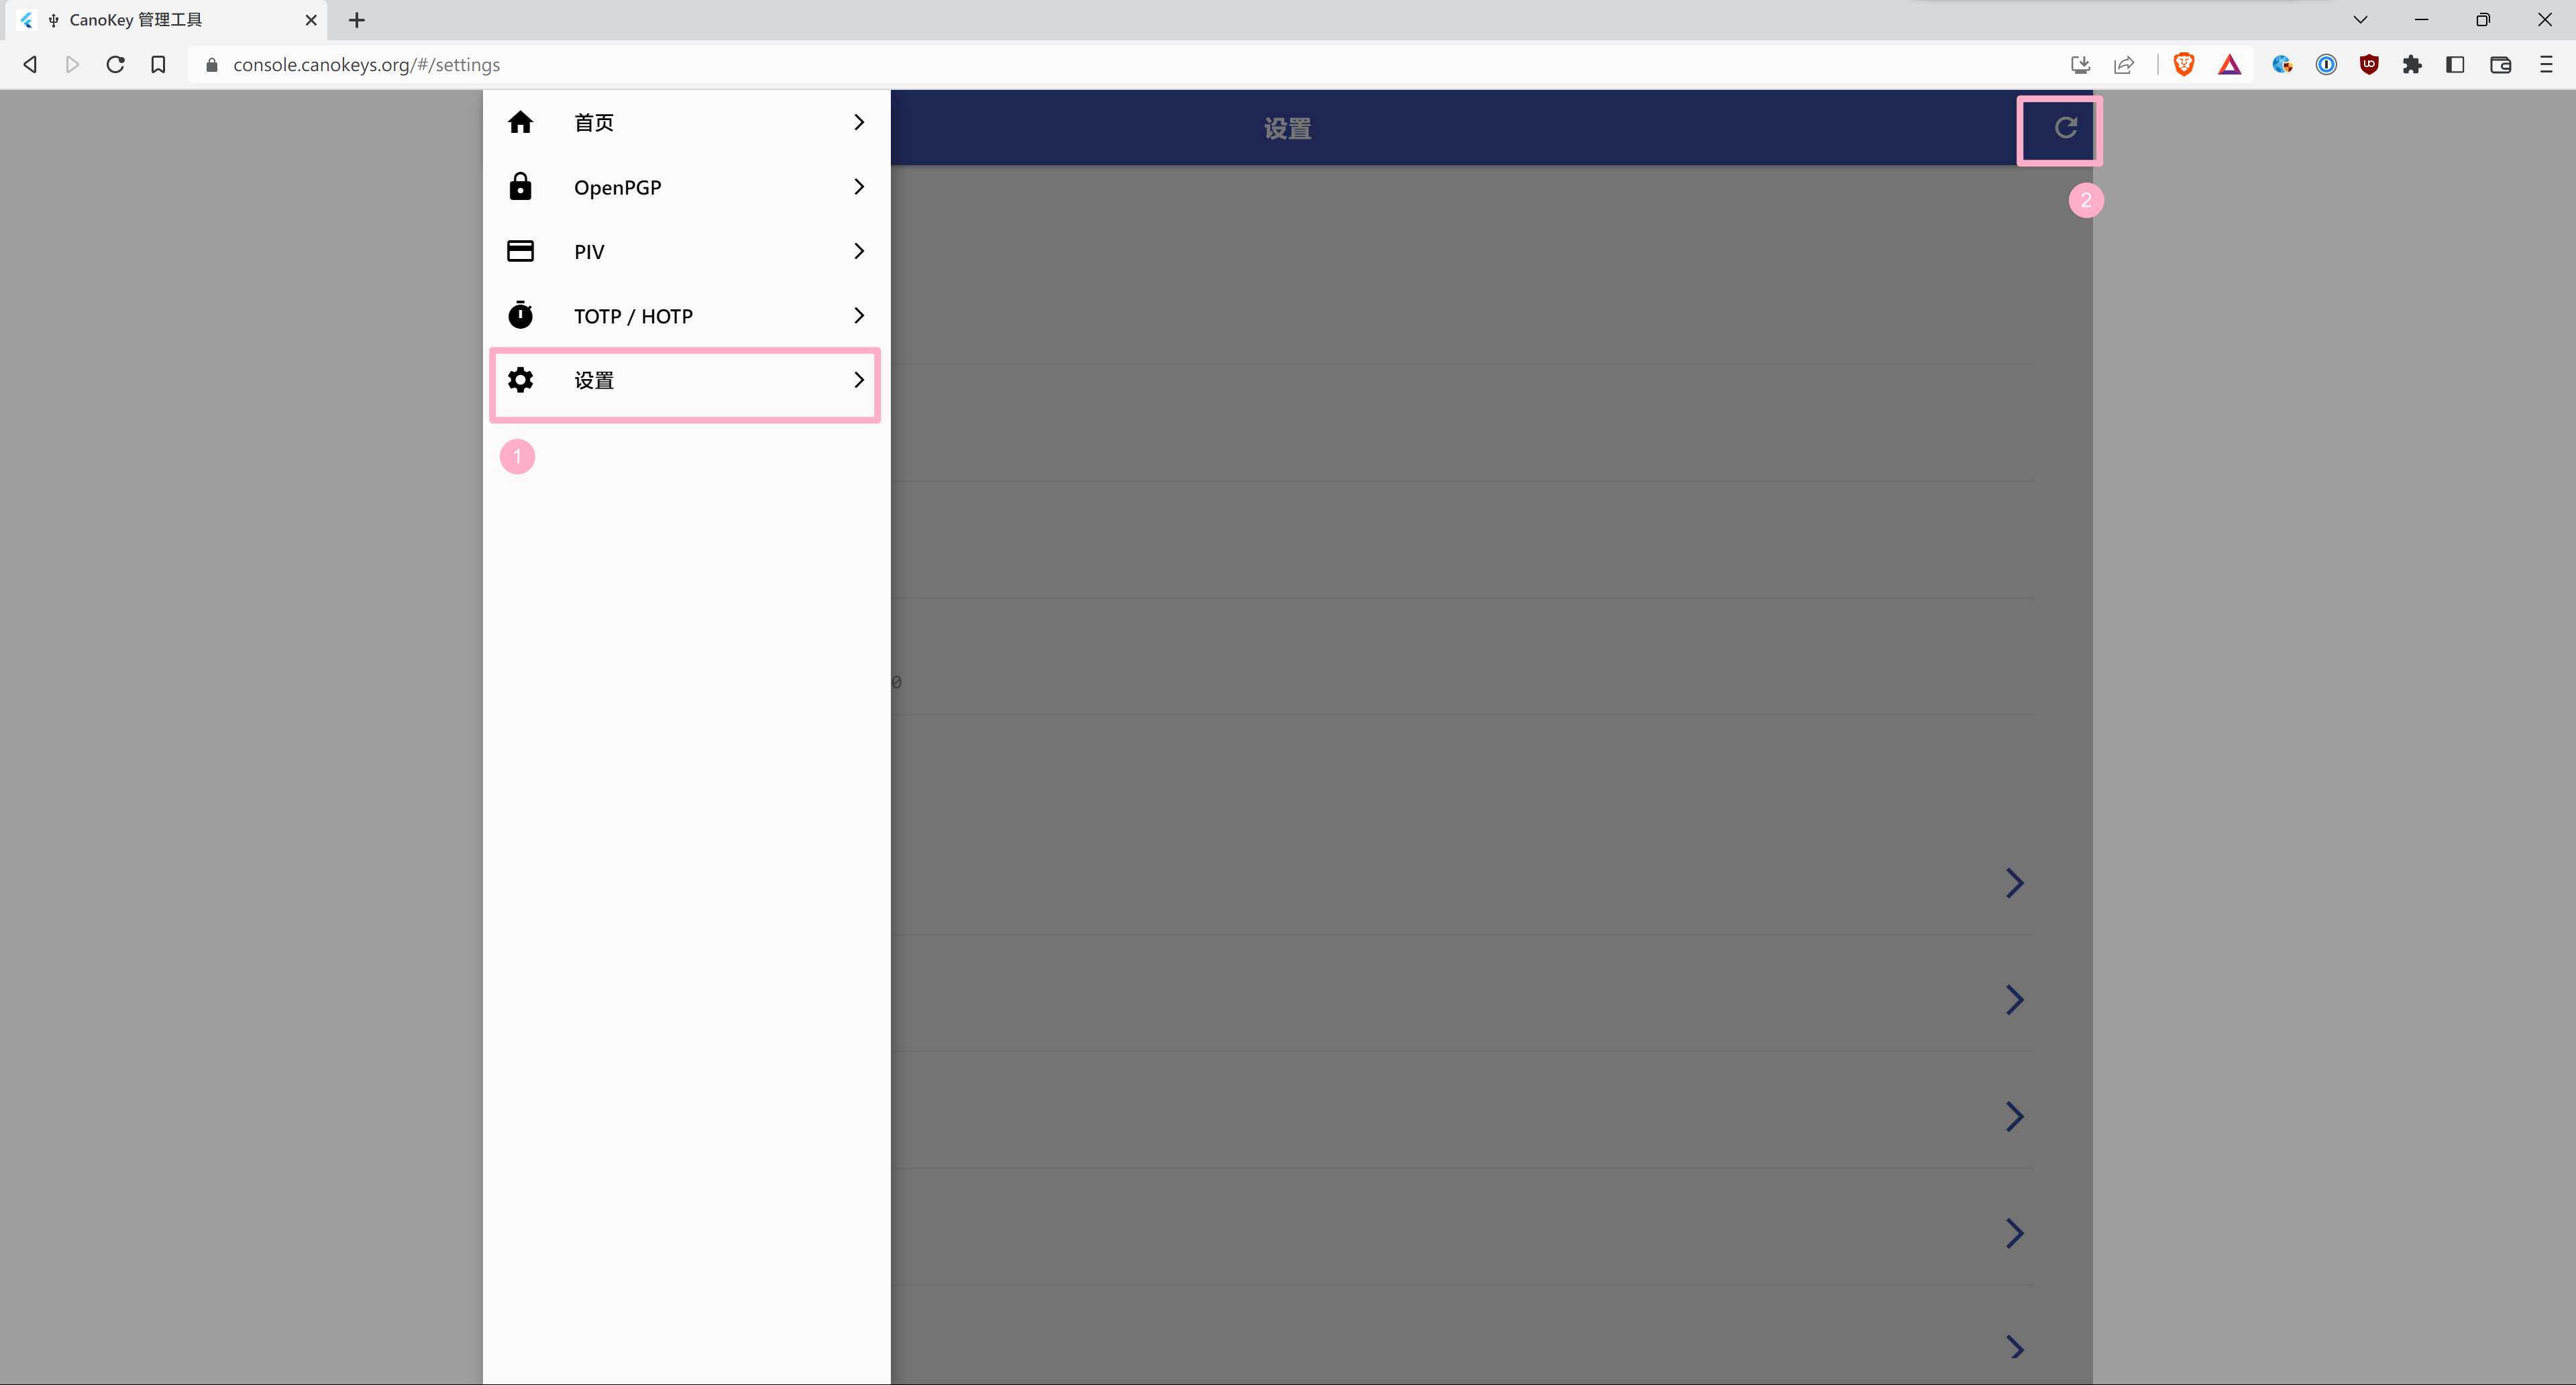
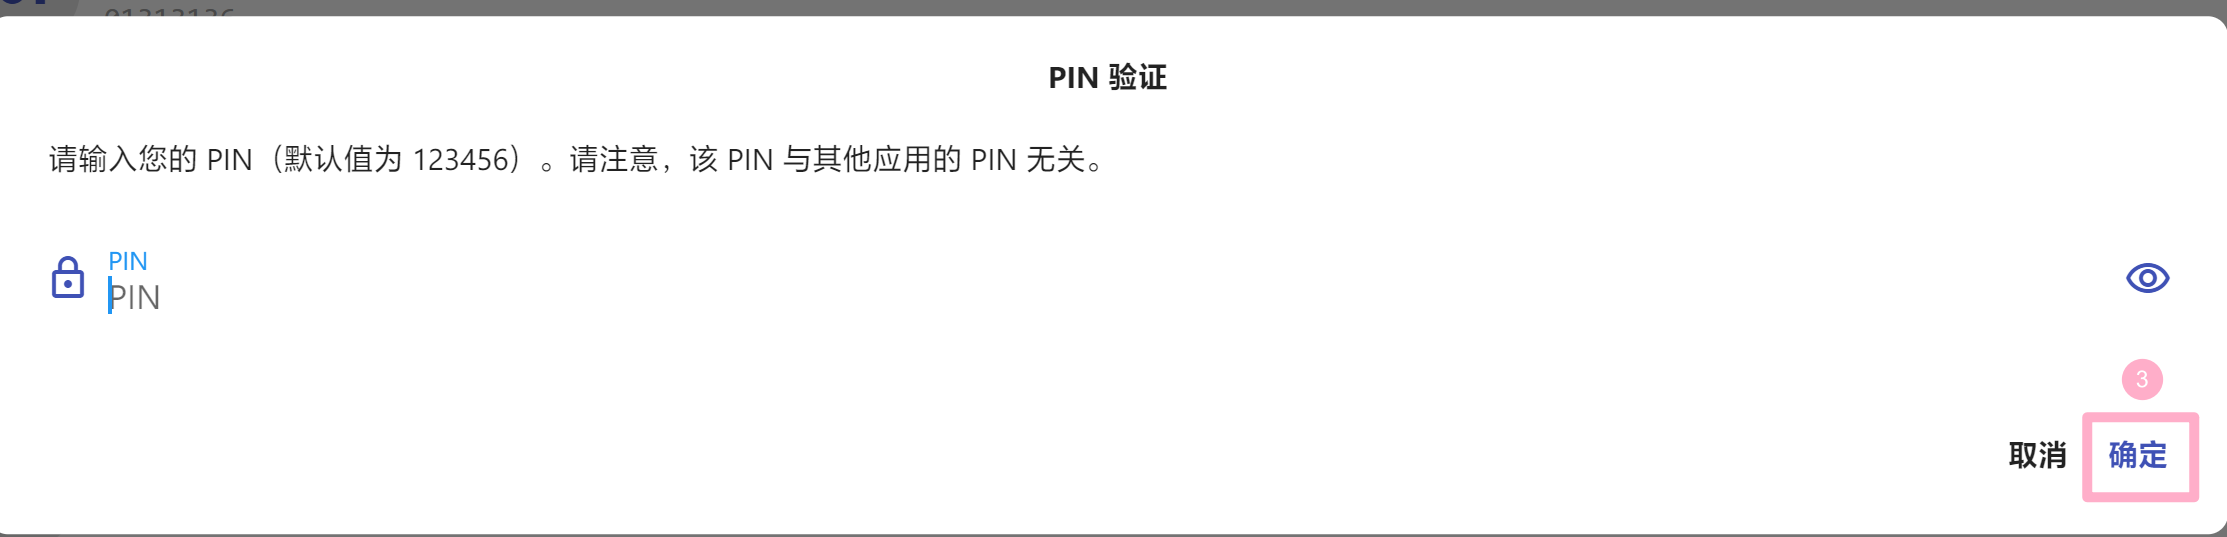
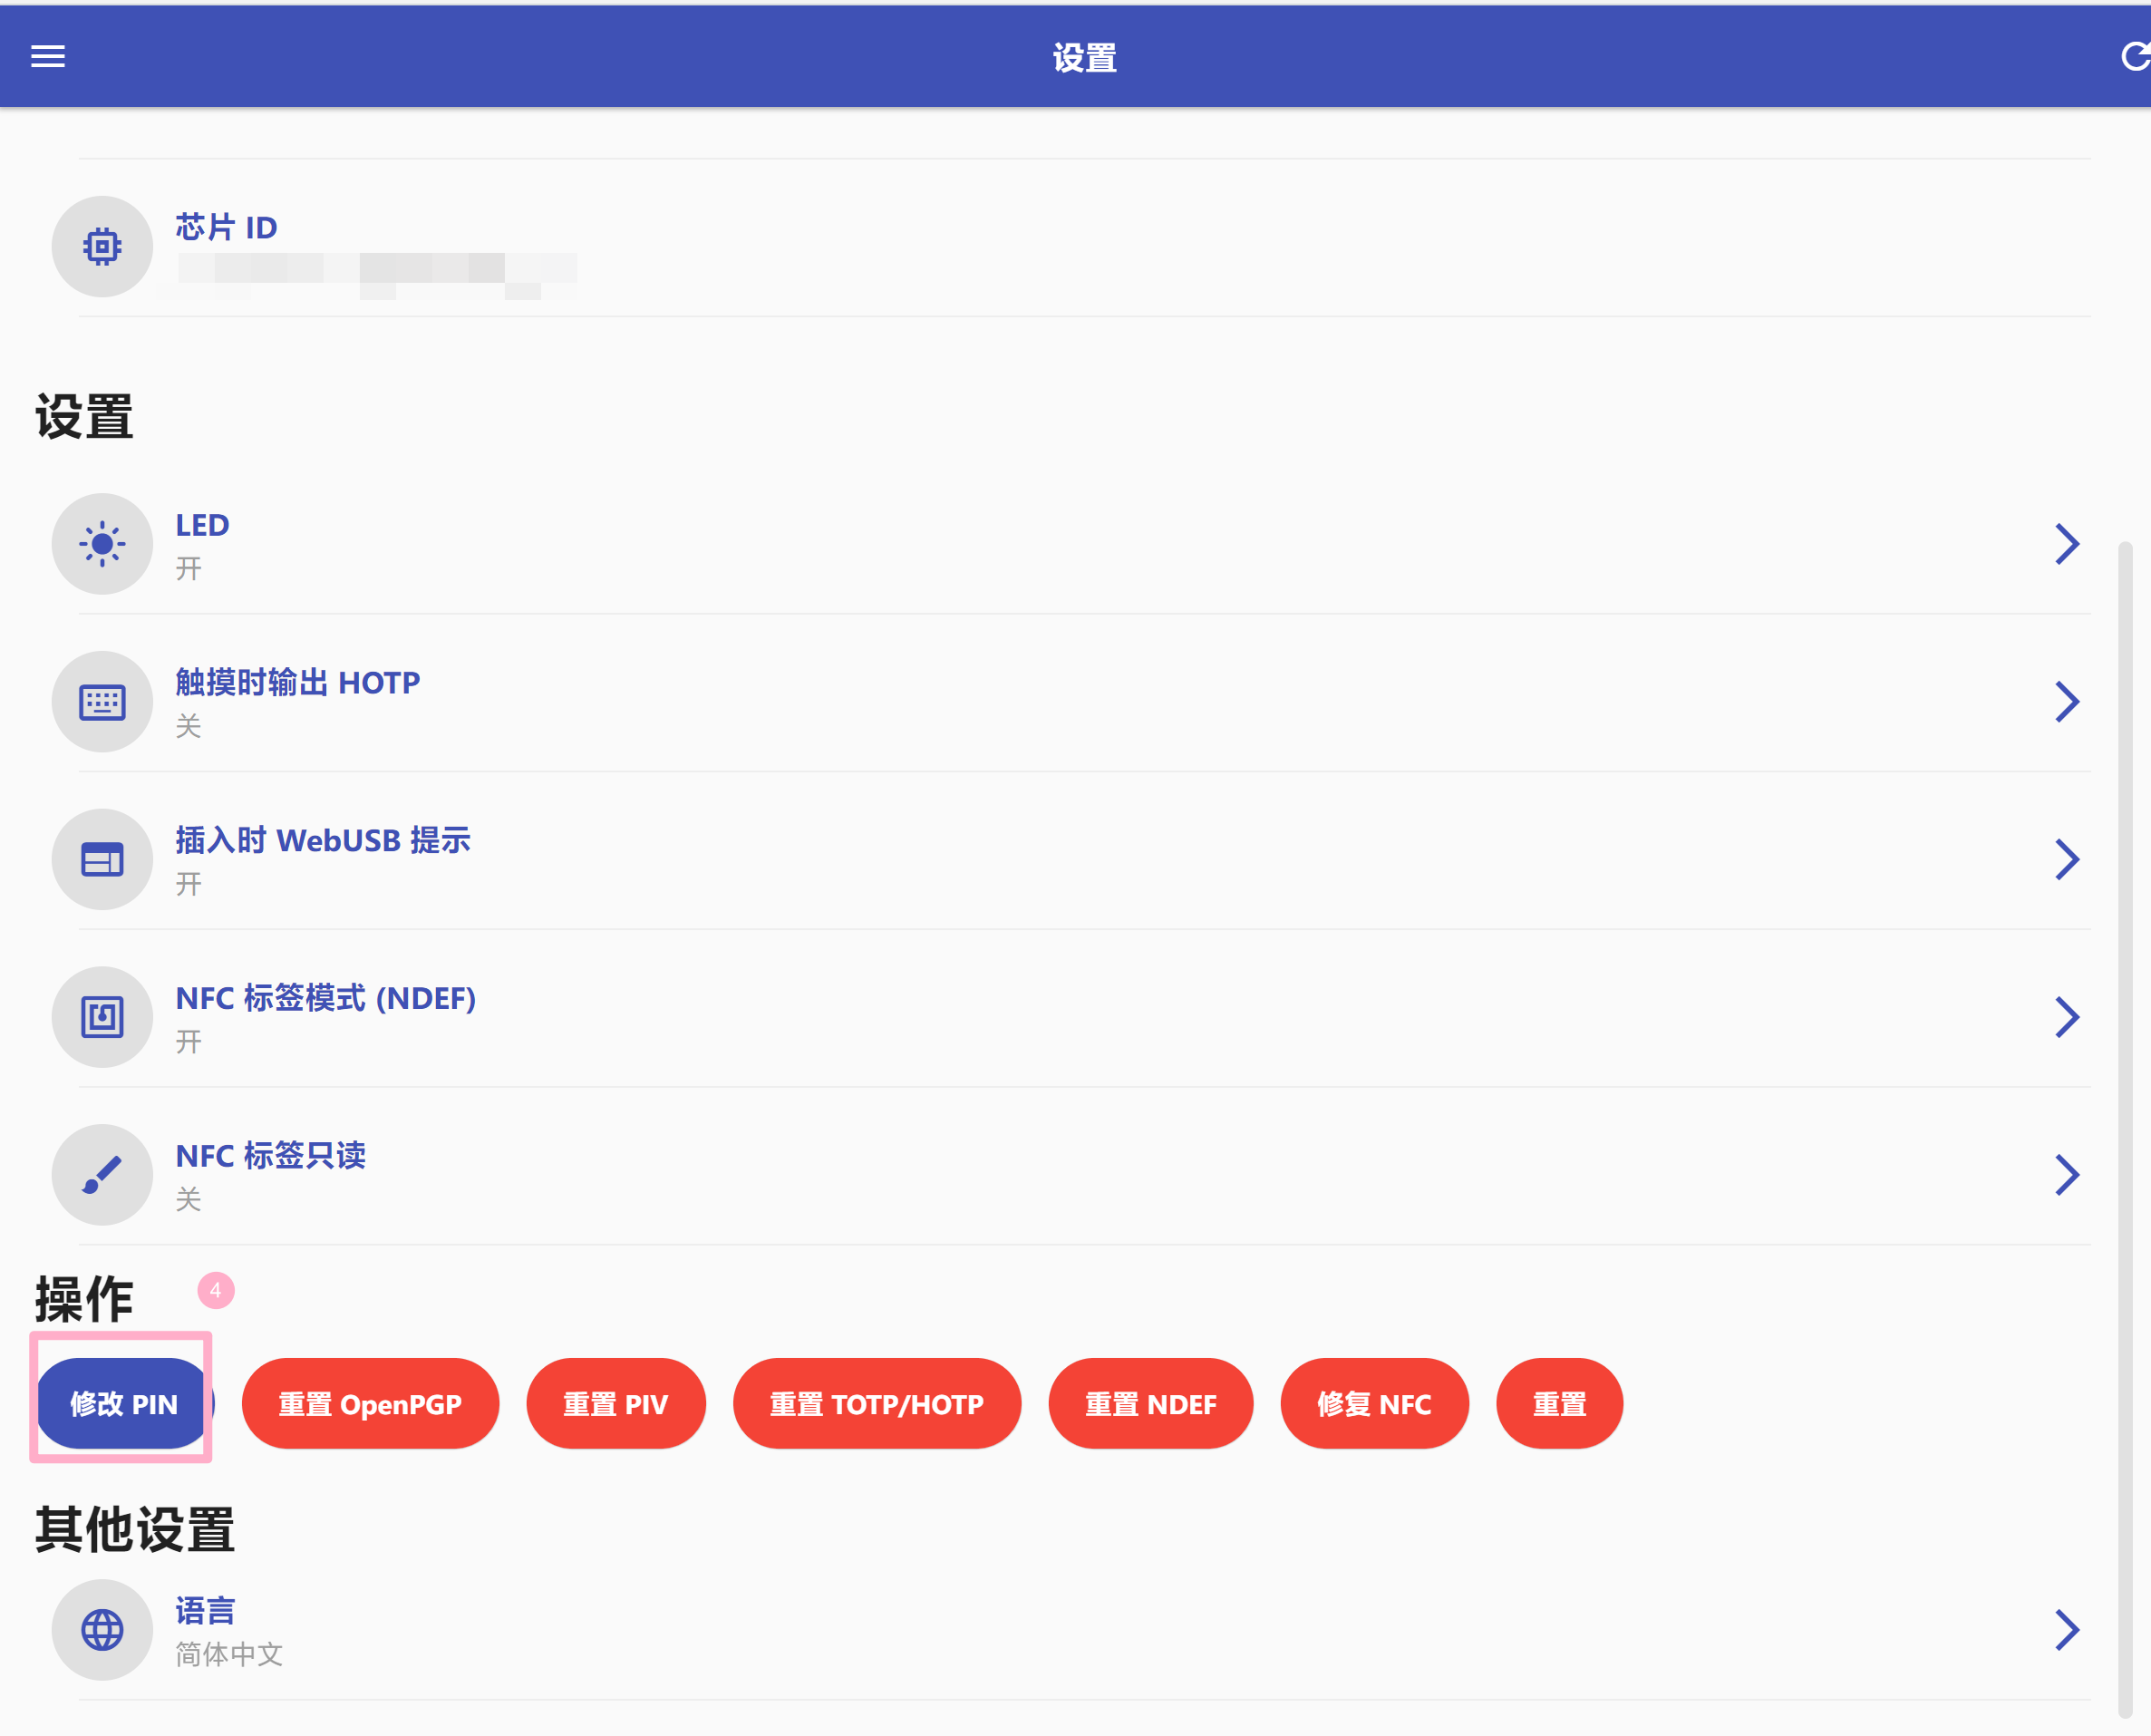
选择“设置”,点击“🔄️”,输入密码后,点击“修改 PIN”。
GPG PIN / Admin PIN

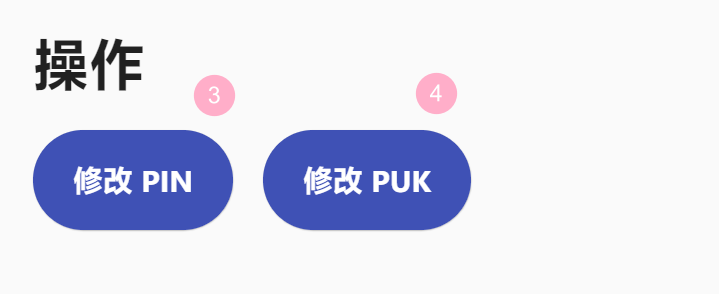
PIV PIN/PUK
OpenPGP
CanoKeys 官方对于 OpenPGP 智能卡的兼容参数列表:
- OpenPGP Smart Card 3.4 Compatible
- RSA 2048 / 4096
- NIST P-256 / P-384
- secp256k1
- ED25519 / X25519
注意: 由于 Windows 的限制,在 Windows 系统中,目前仅支持在卡中直接生成 RSA 2048 位的密钥。
如果你不了解什么是 GPG,以及如何在 Github 上使用 GPG 的话:
说白了,大部分像笔者这种普通开发者来说,GPG 最重要的功能就是对提交,以及和好友之间传递信息用 GPG 进行签名。为什么呢?
- 想一下,如果你的提交不签名;别人冒用你的邮箱做了一些提交会发生什么?Github 这类仓库站点依然识别为 你 这个用户。
- 想一下,发的消息不签名,有什么危险?是的,别人无从判断这个消息到底是不是你发出来的:如果 GPG 流行起来的话,你根本不需要担心你的亲戚朋友到底是不是被盗号然后给你发送借钱诈骗信息——有签名的话,人家确实紧急缺钱。
CanoKeys 的体验是非常流畅的,签名一个提交,在插入 CanoKeys 时,只需要输入 Pin 后,然后触摸一下它(默认关闭,可选打开)),就签名成功了。通过 CanoKeys 这类硬件密钥,我们只有在它插入设备时,才可能执行签名操作的,安全性、逼格这不就起来了么?😎
下面笔者将分享,如何配置这个功能:
配置 GPG 功能
本节参考了 Debian 的智能卡 OpenPGP 以及 GPG 密钥 文档。6
请确保你在系统中安装了 GnuPG2。
- 下面使用 物理密钥 指代 CanoKeys
确认物理密钥是否能被正确识别
在终端中,输入 gpg --card-edit ,如果你的输出看起来与这类似,那么说明 CanoKeys 以及被系统正确识别了。
$ gpg --card-edit                                                               01:29:09

Reader ...........: canokeys.org OpenPGP PIV OATH 0
Application ID ...: *****
Application type .: OpenPGP
Version ..........: 3.4
Manufacturer .....: CanoKeys
Serial number ....: *****
Name of cardholder: [not set]
Language prefs ...: [not set]
Salutation .......:
URL of public key : [not set]
Login data .......: [not set]
Signature PIN ....: forced
Key attributes ...: rsa2048 rsa2048 rsa2048
Max. PIN lengths .: 64 64 64
PIN retry counter : 3 0 3
Signature counter : 0
UIF setting ......: Sign=off Decrypt=off Auth=off
Signature key ....: [none]
Encryption key....: [none]
Authentication key: [none]
General key info..: [none]
配置物理密钥信息
输入 gpg --card-edit 修改看卡片信息,然后跟随下方的注释,填写相关信息即可。
$ gpg --card-edit

Reader ...........: Alcor Micro AU9560 00 00
Application ID ...: 0123456789ABCDEF0123456789ABCDEF
Version ..........: 1.1
Manufacturer .....: PPC Card Systems
Serial number ....: 00000001
Name of cardholder: [not set]
Language prefs ...: de
Sex ..............: unspecified
URL of public key : [not set]
Login data .......: [not set]
Signature PIN ....: forced
Key attributes ...: rsa1024 rsa1024 rsa1024
Max. PIN lengths .: 254 254 254
PIN retry counter : 3 3 3
Signature counter : 0
Signature key ....: [none]
Encryption key....: [none]
Authentication key: [none]
General key info..: [none]

gpg/card> admin # 授予管理员权限
Admin commands are allowed

gpg/card> help # 查看帮助指令
quit           quit this menu
admin          show admin commands
help           show this help
list           list all available data
name           change card holder's name
url            change URL to retrieve key
fetch          fetch the key specified in the card URL
login          change the login name
lang           change the language preferences
sex            change card holder's sex
cafpr          change a CA fingerprint
forcesig       toggle the signature force PIN flag
generate       generate new keys
passwd         menu to change or unblock the PIN
verify         verify the PIN and list all data
unblock        unblock the PIN using a Reset Code
factory-reset  destroy all keys and data

gpg/card> name # 修改持有者姓名
Cardholder's surname: Bar # 修改姓氏
Cardholder's given name: Foo # 修改名字

gpg/card> lang # 修改持有者的偏好语言
Language preferences: en

gpg/card> sex # 修改持有者性别,m 为男性,f 为女性,空格为不填
Sex ((M)ale, (F)emale or space): m

gpg/card> url # 设置你的 GPG 公钥可以获取的途径,别人可以从这个地址获取你的 GPG 公钥,用于确认内容是否是你签名发布的。比如说:Linux 众多的包管理系统用的公钥签名认证就是这个。
URL to retrieve public key: https://example.com/foobar.pub

gpg/card> login # 设置你的 GPG 登录时使用的登录名
Login data (account name): foobar

gpg/card> passwd # 修改 GPG 登录时使用的密码。由于我们已经在后台修改过了,此处跳过即可。
gpg: OpenPGP card no. 0123456789ABCDEF0123456789ABCDEF detected

1 - change PIN
2 - unblock PIN
3 - change Admin PIN
4 - set the Reset Code
Q - quit

Your selection? 2
PIN unblocked and new PIN set.

1 - change PIN
2 - unblock PIN
3 - change Admin PIN
4 - set the Reset Code
Q - quit

Your selection? q

gpg/card> list # 查看更新后的信息

Reader ...........: Alcor Micro AU9560 00 00
Application ID ...: 0123456789ABCDEF0123456789ABCDEF
Version ..........: 1.1
Manufacturer .....: PPC Card Systems
Serial number ....: 00000001
Name of cardholder: Foo Bar
Language prefs ...: en
Sex ..............: male
URL of public key : https://example.com/foobar.pub
Login data .......: foobar
Signature PIN ....: forced
Key attributes ...: rsa1024 rsa1024 rsa1024
Max. PIN lengths .: 254 254 254
PIN retry counter : 3 3 3
Signature counter : 0
Signature key ....: [none]
Encryption key....: [none]
Authentication key: [none]
General key info..: [none]

gpg/card> quit # 退出。完成信息修改。
转移密钥
- 请注意我这里已经在 GPG 中生成好了主密钥,如果你还没有生成过主密钥,您可以查询 相关文档7,创建一个主密钥。
- 出于安全性的考虑,我们不建议你将主密钥迁移到 常用的 物理密钥中。
- 如果你有 额外的 硬解安全令牌,可以考虑将主密钥迁移进去,然后妥善保管,不要插入到安全未知的环境中;
- 否则,请准备一个不常使用的可加密的离线介质,亦或者上文我论述的套娃保险中。
我们默认您已经创建了一个主密钥,且默认有一个加密密钥(永久的)。
现在,我将演示如何为硬解密钥创建一对身份认证密钥(A),一对签名密钥(S),以及迁移原有的加密密钥(E);
首先,我们先查询你的主密钥 标识:
$ gpg --list-keys --with-subkey-fingerprint
C:\****\pubring.kbx
--------------------------------------------------------
pub   ed25519 2021-12-15 [SC]
      ****这一行是你的主密钥标识,请复制它****
uid           [ultimate] a632079 <i@a632079.me>
sub   cv25519 2021-12-15 [E]
      *****
然后,我们先打开密钥的编辑状态:
$ gpg --expert --edit-key ***** # 将星号部分替换成你密钥标识
gpg (GnuPG) 2.4.0; Copyright (C) 2021 g10 Code GmbH
This is free software: you are free to change and redistribute it.
There is NO WARRANTY, to the extent permitted by law.

Secret key is available.

sec  ed25519/*****
     created: 2021-12-15  expires: never       usage: SC
     trust: ultimate      validity: ultimate
ssb  cv25519/*****
     created: 2021-12-15  expires: never       usage: E
[ultimate] (1). a632079 <i@a632079.me>

gpg>
在 CanoKeys 里创建身份验证子令牌:
gpg> addcardkey [authentication] # 注意要带方框一起复制进终端
Signature key ....: [none]
Encryption key....: [none]
Authentication key: [none]

Please select the type of key to generate:
   (1) Signature key
   (2) Encryption key
   (3) Authentication key
Your selection? 3 # 输入 3 创建身份认证密钥
Please specify how long the key should be valid.
         0 = key does not expire # 令牌不会过期
      <n>  = key expires in n days # 令牌将在 n 天后过期
      <n>w = key expires in n weeks # 令牌将在 n 星期后过期
      <n>m = key expires in n months # 令牌将在 n 月后过期
      <n>y = key expires in n years # 令牌将在 n 年后过期
Key is valid for? (0) 1y # 我们这里设置为 一年 后过期
Key expires at 2024/2/10 17:41:47 CST
Is this correct? (y/N) y # 信息十分正确?输入 y 表示确认信息正确
Really create? (y/N) y # 真的要创建它嘛?输入 y 表示确认信息正确

sec  ed25519/*****
     created: 2021-12-15  expires: never       usage: SC
     trust: ultimate      validity: ultimate
ssb  cv25519/*****
     created: 2021-12-15  expires: never       usage: E
ssb  rsa2048/*****
     created: 2023-02-10  expires: 2024-02-10  usage: A # A 代表这个是身份认证用途的子密钥
     card-no: F1D0 ***** # 看到这里刷出 Card-No 代表我们成功在 CanoKeys 创建了密钥
在 CanoKeys 里创建签名子令牌:
gpg> addcardkey [signature] # 注意要带方框一起复制进终端
Signature key ....: [none]
Encryption key....: [none]
Authentication key: *****

Please select the type of key to generate:
   (1) Signature key
   (2) Encryption key
   (3) Authentication key
Your selection? 1 # 输入 1 创建签名密钥
Please specify how long the key should be valid.
         0 = key does not expire
      <n>  = key expires in n days
      <n>w = key expires in n weeks
      <n>m = key expires in n months
      <n>y = key expires in n years
Key is valid for? (0) 1y # 我们这里设置为 一年 后过期
Key expires at 2024/2/10 17:44:48 CST
Is this correct? (y/N) Y # 信息十分正确?输入 y 表示确认信息正确
Really create? (y/N) y # 真的要创建它嘛?输入 y 表示确认信息正确

sec  ed25519/*****
     created: 2021-12-15  expires: never       usage: SC
     trust: ultimate      validity: ultimate
ssb  cv25519/*****
     created: 2021-12-15  expires: never       usage: E
ssb  rsa2048/*****
     created: 2023-02-10  expires: 2024-02-10  usage: A
     card-no: F1D0 *****
ssb  rsa2048/*****
     created: 2023-02-10  expires: 2024-02-10  usage: S # S 代表 签名密钥
     card-no: F1D0 ***** # 看到这里刷出 Card-No 代表我们成功在 CanoKeys 创建了密钥
[ultimate] (1). a632079 <i@a632079.me>
我们将自动生成的加密密钥导入 CanoKeys:
gpg> key 1 # 选中下标为 1 的密钥,此处为自动生成的加密密钥;请注意:这里和数组下标类似,第一位从 0 开始。
sec ed25519/*****
created: 2021-12-15 expires: never usage: SC
trust: ultimate validity: ultimate
ssb* cv25519/*****
created: 2021-12-15 expires: never usage: E
ssb rsa2048/*****
created: 2023-02-10 expires: 2024-02-10 usage: A
card-no: F1D0 *****
ssb rsa2048/*****
created: 2023-02-10 expires: 2024-02-10 usage: S
card-no: F1D0 *****
[ultimate] (1). a632079 <i@a632079.me>
gpg> keytocard # 将选中的密钥存入 CanoKey 中
Please select where to store the key: # 请选择 CanoKey 的哪块区域存储密钥呢?
(2) Encryption key # (2) 加密密钥
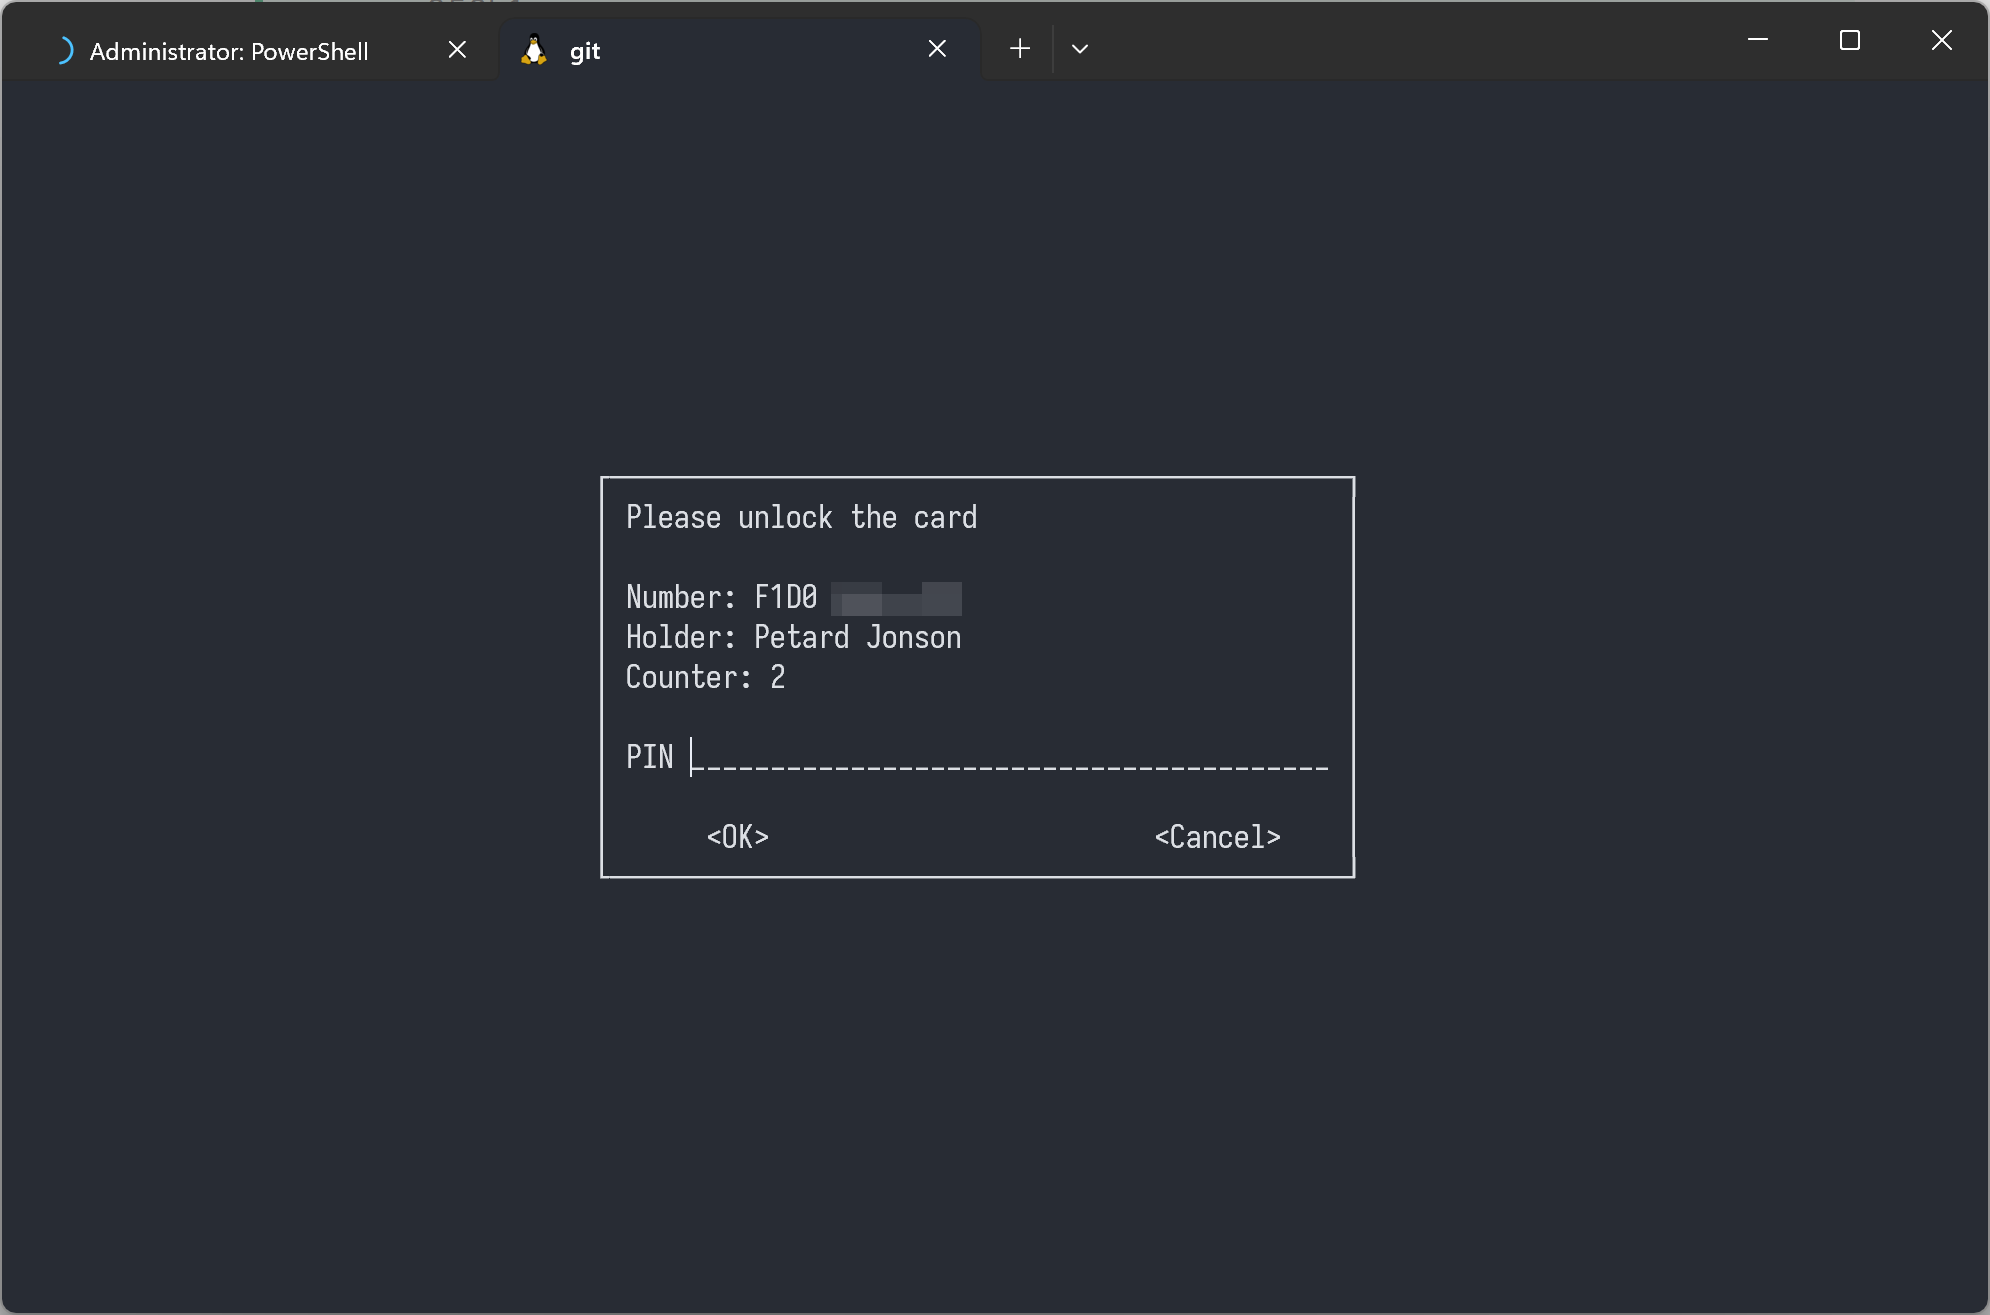
Your selection? 2 # 我们输入 2,然后完成对 GPG 密码,以及 CanoKey Admin Pin 的确认
sec ed25519/*****
created: 2021-12-15 expires: never usage: SC
trust: ultimate validity: ultimate
ssb* cv25519/*****
created: 2021-12-15 expires: never usage: E # E 代表加密密钥
card-no: F1D0 ***** # 可以看到这里也多了 card-no 说明导入成功
ssb rsa2048/*****
created: 2023-02-10 expires: 2024-02-10 usage: A
card-no: F1D0 *****
ssb rsa2048/*****
created: 2023-02-10 expires: 2024-02-10 usage: S
card-no: F1D0 *****
[ultimate] (1). a632079 <i@a632079.me>我们再检查下卡片状态,看看是不是都正确导入了:
$ gpg --card-status
Reader ...........: canokeys.org OpenPGP PIV OATH 0
Application ID ...: *****
Application type .: OpenPGP
Version ..........: 3.4
Manufacturer .....: CanoKeys
Serial number ....: *****
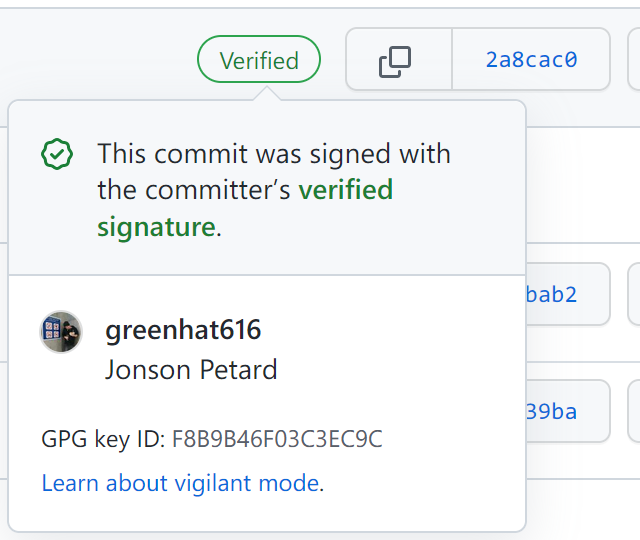
Name of cardholder: Petard Jonson
Language prefs ...: en
Salutation .......: Mr.
URL of public key : https://i.a632079.me/keys/gpg.pub
Login data .......: a632079
Signature PIN ....: forced
Key attributes ...: rsa2048 cv25519 rsa2048
Max. PIN lengths .: 64 64 64
PIN retry counter : 3 0 3
Signature counter : 1
UIF setting ......: Sign=off Decrypt=off Auth=off
Signature key ....: *****
created ....: 2023-02-10 09:44:45
Encryption key....: *****
created ....: 2021-12-15 08:56:17
Authentication key: *****
created ....: 2023-02-10 09:41:36
General key info..: sub rsa2048/***** 2023-02-10 a632079 <i@a632079.me>
sec ed25519/***** created: 2021-12-15 expires: never
ssb> cv25519/***** created: 2021-12-15 expires: never
card-no: F1D0 *****
ssb> rsa2048/***** created: 2023-02-10 expires: 2024-02-10
card-no: F1D0 *****
ssb> rsa2048/***** created: 2023-02-10 expires: 2024-02-10
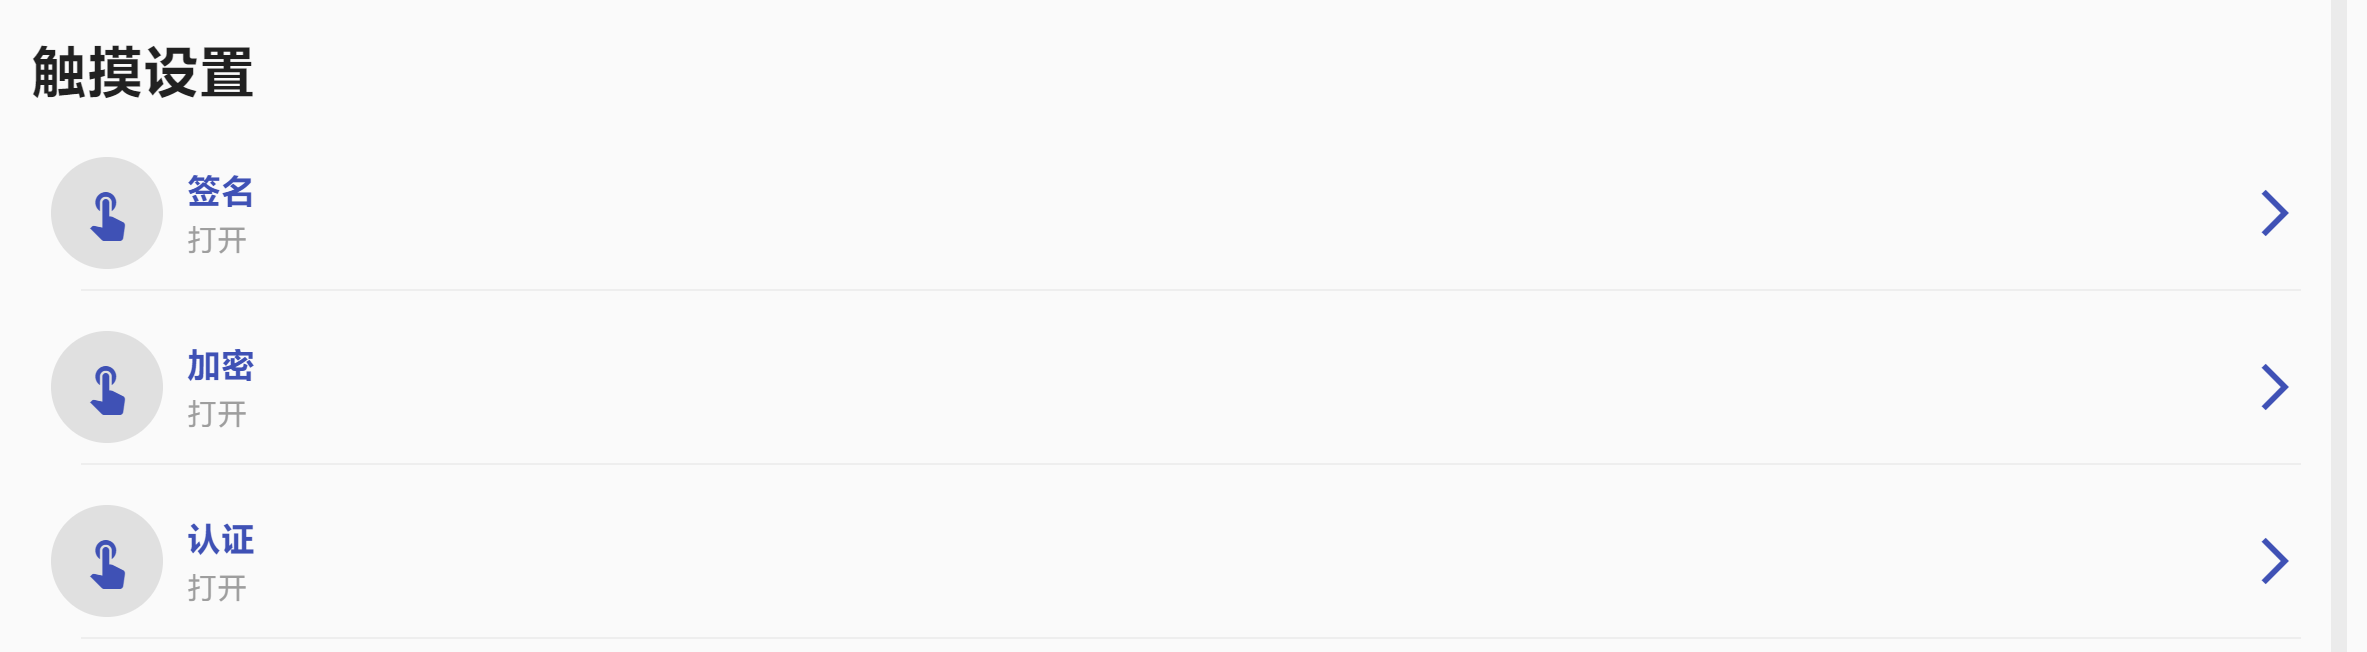
card-no: F1D0 ***** 最后,记得进 Web Console 将 GPG 的触摸密钥认证状态都打开。

使用 usbipd 配置 WSL2 支持
首先,我们需要下载安装 usbipd 和 gsudo:
$ winget install usbipd
$ winget install gerardog.gsudo
然后,配置一下 WSL 的环境依赖:
$ sudo apt install linux-tools-virtual hwdata
$ sudo update-alternatives --install /usr/local/bin/usbip usbip `ls /usr/lib/linux-tools/*/usbip | tail -n1` 20
重新打开一个终端,列出当前系统拥有的 USB 设备:
$ usbipd wsl list                                                               21:24:28
BUSID  VID:PID    DEVICE                                                        STATE
2-4    0c76:1676  USB PnP Audio Device, USB 输入设备                            Not attached
2-6    048d:ce00  USB 输入设备                                                  Not attached
2-10   048d:6005  USB 输入设备                                                  Not attached
2-12   046d:c539  USB 输入设备                                                  Not attached
2-13   04f2:b68b  HD Webcam, IR Camera                                          Not attached
2-14   8087:0026  英特尔(R) 无线 Bluetooth(R)                                   Not attached
2-18   0bda:0316  Realtek USB 3.0 Card Reader                                   Not attached
5-4    20a0:42d4  USB 输入设备, WebUSB, Microsoft Usbccid Smartcard Reader ...  Not attached
这里我们可以看到,我的 CanoKeys 在这里的 BUSID 为 5-4。
然后,我们把 CanoKeys 绑定到 WSL 中去:
$ sudo usbipd wsl attach --busid=5-4
usbipd: info: Using default WSL distribution 'Ubuntu'; specify the '--distribution' option to select a different one.
测试一下,能否在 WSL 中检出 CanoKeys:
$ lsusb
Bus 002 Device 001: ID 1d6b:0003 Linux Foundation 3.0 root hub
Bus 001 Device 002: ID 20a0:42d4 Clay Logic CanoKey Pigeon # 可以看到我们的 CanoKeys 已经成功加载进 WSL 中了
Bus 001 Device 001: ID 1d6b:0002 Linux Foundation 2.0 root hub
如果你已经正确安装了 GPG 支持 SmartCards 的所需依赖的话,请直接确认:
$ gpg --card-status
Reader ...........: *****
Application ID ...: *****
Application type .: OpenPGP
Version ..........: 3.4
Manufacturer .....: unknown
Serial number ....: *****
Name of cardholder: Petard Jonson
Language prefs ...: en
Salutation .......: Mr.
URL of public key : https://i.a632079.me/keys/gpg.pub
Login data .......: a632079
Signature PIN ....: forced
Key attributes ...: rsa2048 cv25519 rsa2048
Max. PIN lengths .: 64 64 64
PIN retry counter : 3 0 3
Signature counter : 1
Signature key ....: *****
      created ....: 2023-02-10 09:44:45
Encryption key....: *****
      created ....: 2021-12-15 08:56:17
Authentication key: *****
      created ....: 2023-02-10 09:41:36
General key info..: [none]
如果看到图示的输出的话,那么这意味着你的 CanoKey 已经能被 WSL 子系统正确识别了。
那么,如何 在 WSL 中移除 CanoKey 呢?请执行:
$ sudo usbipd wsl detach --busid=5-4使用套接字转发配置 WSL2 支持(可能不受支持)
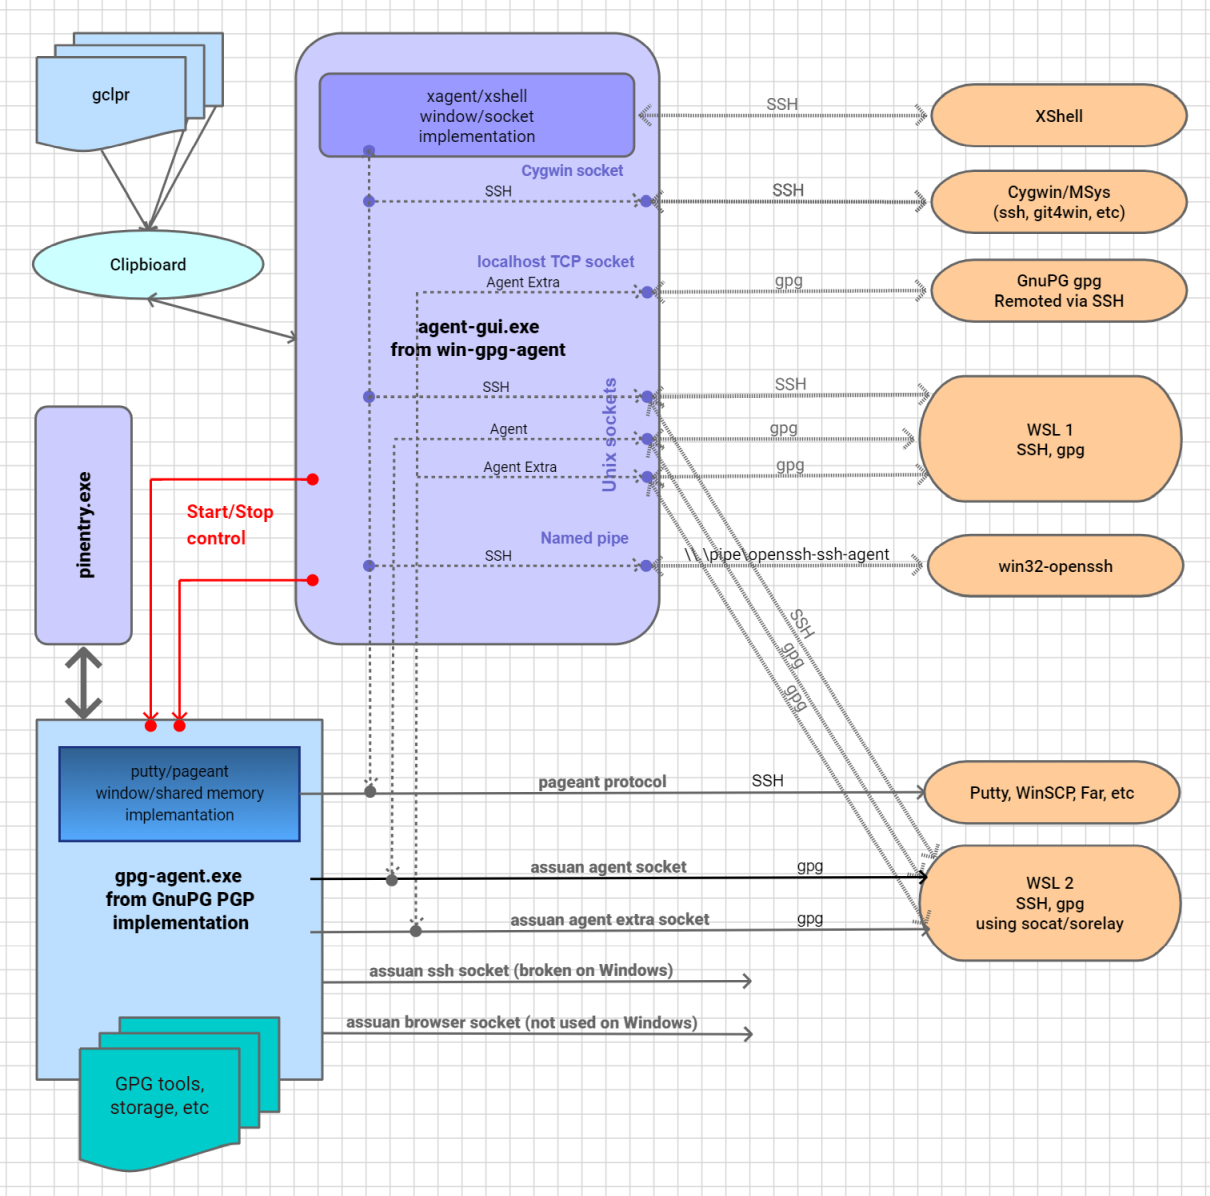
由于转发协议的复杂性,以下内容已经失效(似乎使用 gpg4win 的还能用?我没确定)。但是,GnuPG 并不能直接转发,而几个常提及的转发库都已经 弃用 了,因此,我现在改为使用成本更低,但是稍微麻烦一点的 USB 控制权转移的方法。
- 其文章涵盖了 WSL 1 的支持,因此有关 WSL 1 的配置内容可以直接参考他的文章。
WSL 2 本质上是个 HyperV 虚拟机,理论上必须硬件直通才有可能在 WSL2 中使用 CanoKeys。但是……
原理: 得益于 GnuPG 客户端是使用 IPC 或者 你懂的 与 Agent 套接字 连接的,因此我们可以让 WSL 的 GnuPG 客户端通过网络与 Windows 上的 GnuPG Agent 建立连接——这样不就能用 Windows 上的 CanoKeys 了嘛,而且两个 OS 都能使用:非常棒😎!
首先,为了保持优雅,我们先安装 gsudo。
$ scoop install gsudo # Scoop 使用者
$ winget install gerardog.gsudo # Win11 或高版本 Win10 都内置,普通用户可以直接使用这个
放行 WSL 网卡的入站流量,在 具有管理员权限 中执行:
$ New-NetFirewallRule -DisplayName "WSL" -Direction Inbound -InterfaceAlias "vEthernet (WSL)" -Action Allow # 放行 WSL 网卡的入站流量

Name                          : {*****}
DisplayName                   : WSL
Description                   :
DisplayGroup                  :
Group                         :
Enabled                       : True
Profile                       : Any
Platform                      : {}
Direction                     : Inbound
Action                        : Allow
EdgeTraversalPolicy           : Block
LooseSourceMapping            : False
LocalOnlyMapping              : False
Owner                         :
PrimaryStatus                 : OK
Status                        : 已从存储区成功分析规则。 (65536)
EnforcementStatus             : NotApplicable
PolicyStoreSource             : PersistentStore
PolicyStoreSourceType         : Local
RemoteDynamicKeywordAddresses : {}
在 ~ 目录下编辑 .communicate_with_windows_gpg.sh,填入按如下内容:
#!/bin/bash

WinUserName="change here plz!" # 记得将这里改成你的 Windows 用户名
HOST_IP=$(cat /etc/resolv.conf |grep "nameserver" |cut -f 2 -d " ") # JUST FOR WINDOWS
rm $HOME/.gnupg/S.gpg-agent*
GPG_AGENT="/mnt/c/Users/"$WinUserName"/AppData/Local/gnupg/S.gpg-agent"
# GPG_AGENT="/mnt/c/Users/"$WinUserName"/scoop/persist/gnupg/home/S.gpg-agent" # 如果你使用 Scoop 的话,记得使用这行
PREPEND_FILE="/tmp/gpg_agent_prepend"
WINDOWS_GPG_AGENT_PORT=$(head -n1 "$GPG_AGENT")

WIN_FORWARD=$(netstat.exe -ano | grep "$HOST_IP:$WINDOWS_GPG_AGENT_PORT" | wc -l)
if [ $WIN_FORWARD -eq 0 ];then # PREVENT POP-UP WINDOW OF UAC EVERYTIME!
    sudo.exe netsh.exe interface portproxy add v4tov4 \
    listenport=$WINDOWS_GPG_AGENT_PORT listenaddress=$HOST_IP \
    connectport=$WINDOWS_GPG_AGENT_PORT connectaddress=127.0.0.1
fi
tail -n+2 "$GPG_AGENT" >"$PREPEND_FILE"
nohup socat "UNIX-LISTEN:$HOME/.gnupg/S.gpg-agent,fork" "SYSTEM:cat \"$PREPEND_FILE\" - <&3 | socat STDIO \"TCP\:$HOST_IP\:$WINDOWS_GPG_AGENT_PORT\" >&4,fdin=3,fdout=4" >/dev/null 2>&1 &
然后编辑 .bashrc (如果你使用 bash)或者 .zshrc 如果你使用 zsh,在末尾加入:
bash ./.communicate_with_windows_gpg.sh重开一个 bash,测试一下:
$ gpg --card-status如果不出意外,那你应该会得到和 windows 中返回的数据一致的结果。
FIDO2 / WebAuthn
CanoKeys 官方对于此功能的参数描述:
- FIDO2 / WebAuthn
- 无限量普通密钥
- 最多 64 组 resident keys
- 支持 HMAC 扩展
如果你不了解 FIDO2 的话,可以浅看一下这个:FIDO2 Project - Wikipedia。
又想再深入了解一点,可以仔细看一下这个:FIDO 是什么? - 王妙妙小同学的回答 - 知乎
这玩意就类似于之前银行流行的电子密保 U 盾,每个人都是独一份的,插在电脑上,才可以用网银交易。
笔者主要用于几个常用用户的辅助认证,以及 Windows、Arch Linux 的登录认证上。
配置
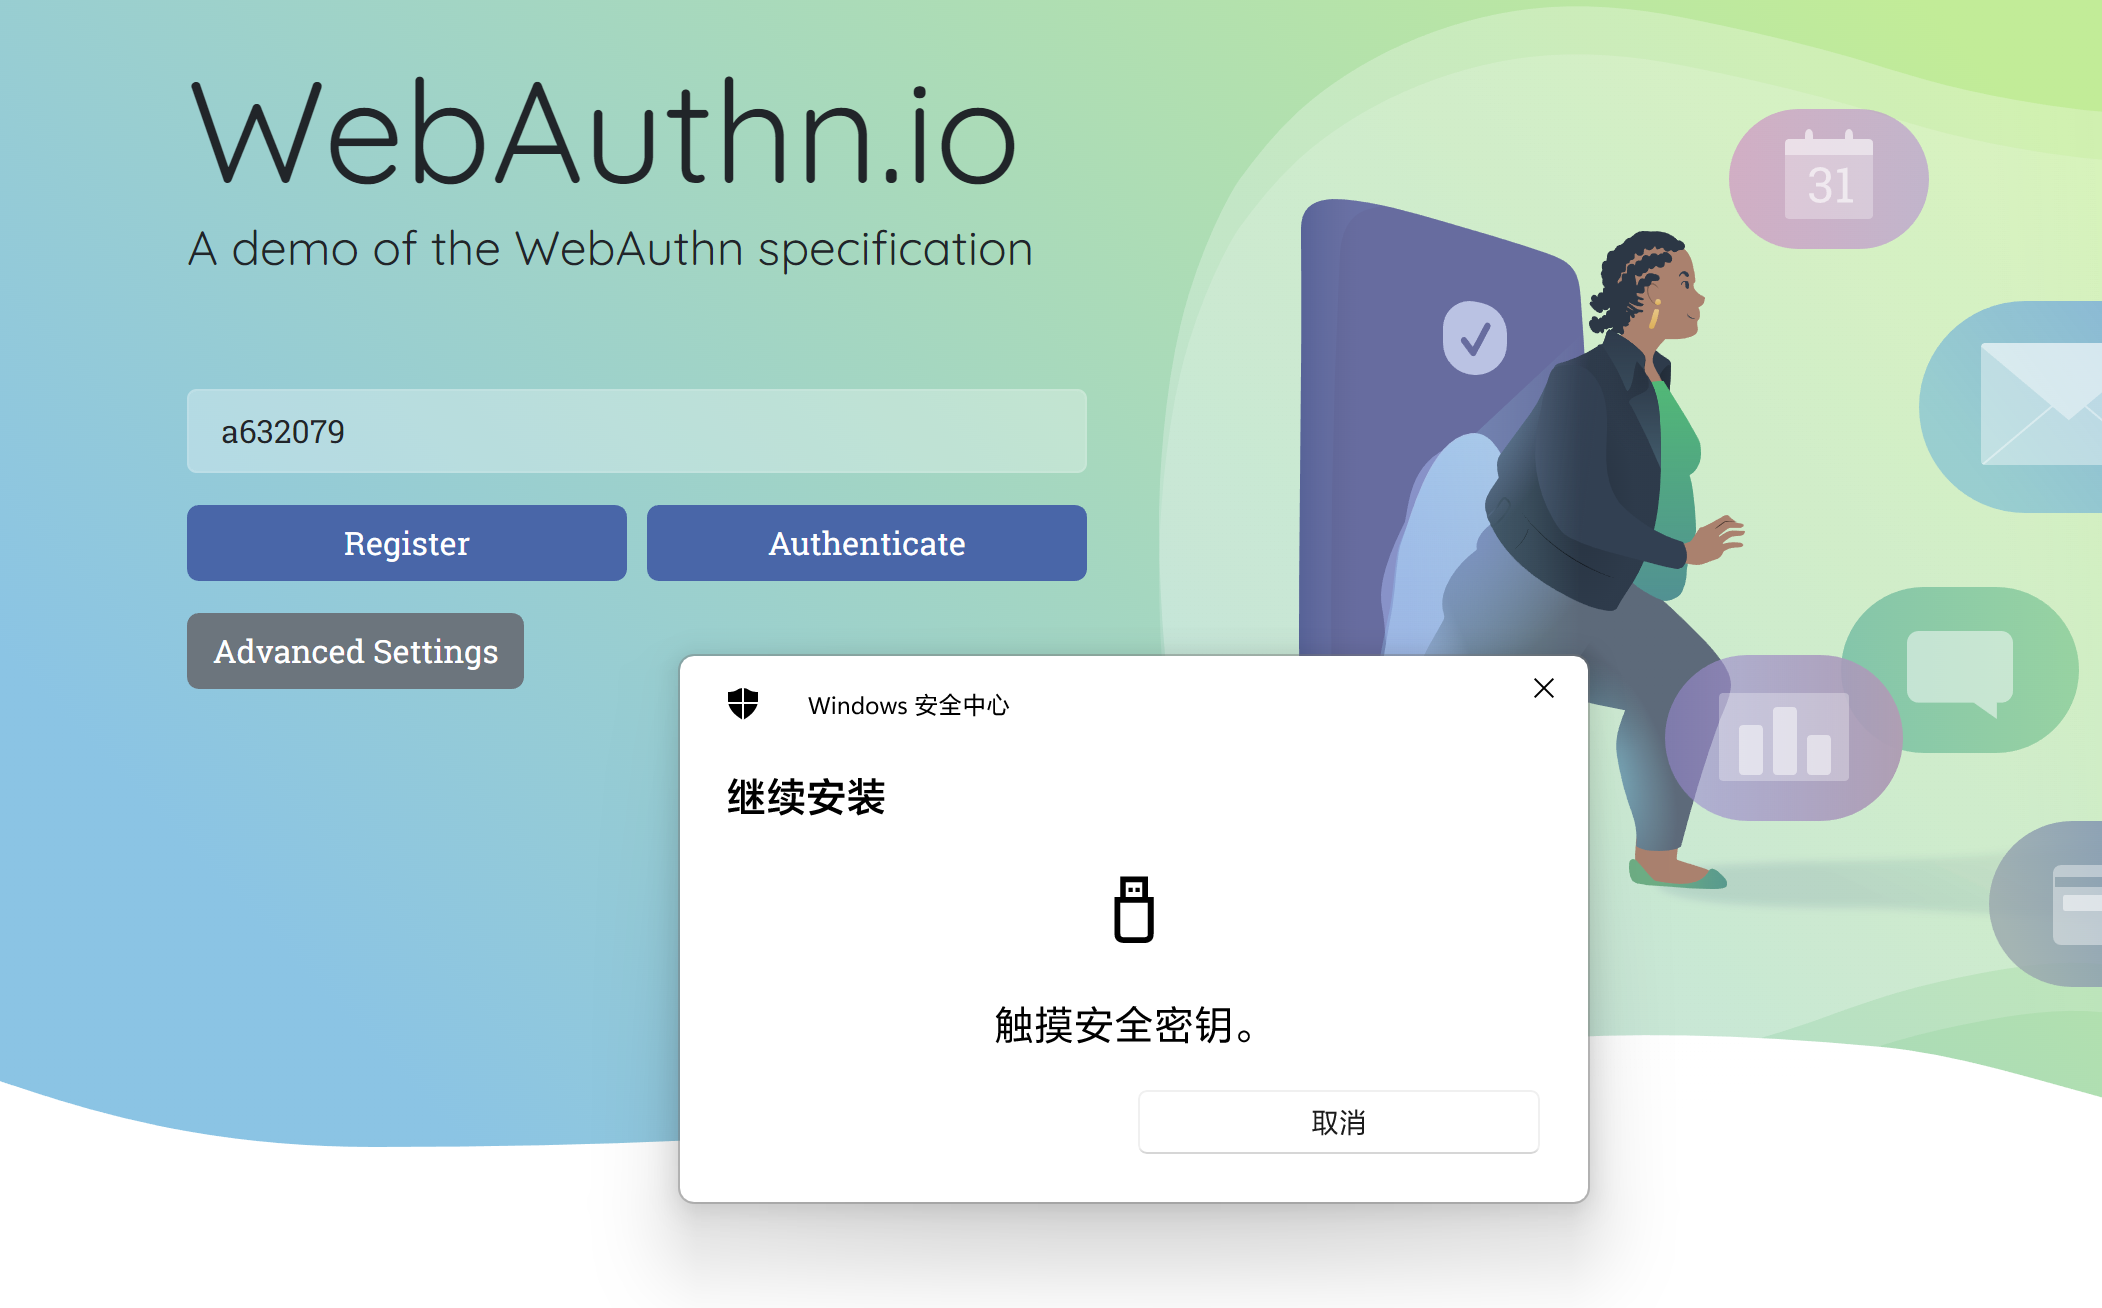
使用此功能的方法非常简单,Windows 环境下只需要在 设置 - 账户 中启用他,然后配置个密码即可。
一般来说只要遵循 WebAuthn.io 标准的,你可以都可以直接在站点里配置使用安全密钥登录(或者二步认证手段)。
- 比如说 Github、Microsoft、Google。

PIV
待完成
HOTP/TOTP
这种可以简单理解为类似目前流行的 双 因素 认证,且具备替代性(说白了大部分场景就是这个用途)。
由于本人使用 Microsoft Authenticator + 1Password 的 双 因素 认证器方案,因此此功能我没有体验过,我就不误人子弟,自作主张教学了。
如果您想体验的话,这些信息也许你可以参考一下:
- 可以直接使用 Yubikey 的客户端;
- 安卓端 APP 由于有白名单,因此,需要找个魔改版本的 APP——具体参考本文末尾的其他博客的体验文章链接。
NDEF(NFC 功能)
=,= 目前我手里没有啥设备能测试这个功能的—— IOS 需要至少两个安全密钥才能激活这个功能,但我目前就买了一个作为体验。目前计划 等大佬完善更多的功能 后,我再买几个。届时我再把这个坑给填了(别画饼阿喂!)
- 作为 Yubikey 的廉价替代品,由于 CanoKey 的供电功率比较低,NFC 会差一些;
- 但据其他博主反馈,在更新了神秘代码后(进入 Web Console 验证后,会自动刷写改善体验),只要找准位置,体验还是满丝滑的
引用 & 注解
Footnotes
-
条 幅 图片来源:https://blog.cubercsl.site/post/canokey-unboxing/,如有侵权请联系博主! ↩
-
该段内容原文引用 CanoKeys 开箱 - CSL 讲废话 ↩
-
其实因为内存原因,直接把系统删了;目前换了个 2TB 的 Samsung 970 Evo Plus,又可以折腾折腾了~ ↩
-
指 Smartcards OpenPGP - Debian Wiki 以及 Creating a new GPG key - Debian Wiki ↩
-
推荐参考:生成新 GPG 密钥 - Github 文档 ↩
文章标题:硬件安全密钥折腾记 —— CanoKeys - 藤之青
文章地址:https://i.a632079.me/posts/cano-keys-first-try/
本文采用 知识共享署名-非商业性使用-相同方式共享 4.0 国际许可协议 进行许可。
文本排版遵循 中文文案排版指北 ;允许自由转载和修改,但请务必标明文章来源且不得运用于商业目的并以相同方式分享(不得破坏排版格式)。